Sunday 27 October 2013

HUD, drops and hacking

HUD

Start your missions in Mercury and get used to aiming and moving. Kill anything in the way.
The mission map changes every time but there are a fixed amount of tilesets so eventually you will learn the patterns and know where the shortcuts are. As you are low leveled and will not have access to all abilities till you can equip their mods, do make use of cover!


  • On the top left is a mini map. The yellow exclamation (!) mark is where the objective is. Once the objective is completed extraction will have a big red mark on the minimap.
  • If playing a defense mission or exterminate mission, then just below the minimap you will see how many enemies are left or how much hp the objective you're defending has.
  • The top right is your status showing your warframe and it's level. 
  • The four boxes show the skills equipped and left to right are assigned 1-4 on the keyboard.
  • Blue number is your shield and red is HP.
  • The blue bar is the energy you have for using skills and the green bar shows your stamina. Stamina is consumed by running and wallrunning. If it depletes to zero it will take some time to recover and you will fall off if wallrunning.
  • The bottom right shows what weapon your using and how much ammo you have left.
  • Just above the ammo box at the beginning of the mission you will see a challenge. If you manage to complete it then you get 500 affinity/exp.
  • The bottom left is where chat is. Press t to open the chat box. Pressing z will allow you to see your team's hp on the bottom left.
  • When you aim at an enemy or object its name will appear on the top middle with level and hp. If the bar is blue then the enemy has shields like your warframe.
  • Any drops you pickup will be displayed on the bottom of the screen.

Mini-Map


  • The objective of the mission will have a yellow exclamation mark. 
  • The arrowhead shape at the centre of the minimap is your position. 
  • Green circles are allies.
  • That orange mark near the exclamation mark usually appears on extermination missions, showing where the enemies roughly are.
  • If someone has an aura mod called enemy radar or if you equip enemy sense the enemy will appear as red circles.
  • When someone is downed a red mark will also appear. 
  • Once the objective is complete, extraction will be shown with a red mark:


Drops

Containers you can destroy for drops:


Green Lockers you can open by standing in front of them and pressing x.

Only the green ones can be opened unless you find a rare mod that unlocks red lockers. (I haven't found that mod yet...)

If you have the mod “thief's wit” equipped, nearby containers will have a yellow marker on the minimap:


Mods only drop from enemies:
Resources can come from lockers, containers and enemies

The Mod is the one on the left with blue around it. The one on the right with yellow markings are resources. There are also resources which are marked blue and these are generally the rarer resources.

Once you pickup a mod if there is a strange blue spinning thing leftover, it means not everyone in your team has it picked up and you should lay a waypoint by pressing g on it. This way your team can see it on their minimap:

Someone missed their mod :(

Ammo comes in four different colours:
  • Blue is for rifles and refills 20 rounds. 
  • Orange is for secondary weapons also refilling 20 rounds.
  • Green refills shotguns by 10.
  • Purple(not shown) refills sniper weapons or bows by 10.

Ammo

Credits are also dropped:

Credits are the small blue rectangular objects.


Energy(blue orb), health (red orb that recovers 25hp) and affinity (white orb that gives exp+100 for the warframe) orbs.

Blue orbs give 25 energy


Blueprints are purple and you can check in your foundry to see what you got. Blueprints used to drop as a purple orb from bosses but that has now been stopped. Instead you will get a blueprint after you finish the mission in your rewards screen. Right now I can only see the stalker dropping blueprints for his unique weapons:

Blueprints

Hacking terminals and other obstacles

Sometimes an enemy will lock you out of rooms and you will have to hack a terminal to open the doors. Once this happens the minimap will show a green marker where a terminal is.

Note how its darker and bigger than your teammates' green

Go to the terminal and press x to start a minigame. In this minigame you have a time limit to click on each piece (they rotate clockwise) until they all join up.


Its not difficult just remember to kill nearby enemies first

If playing as a team most levels will have a door, that needs two people to stand on the orange panels on the side of the door and press x at the same time.


Some missions, corpus levels in particular will have laser doors that you can either slide past or deactivate by shooting a camera. Shooting the camera allows you and your team to pass easily as some doors make it hard to slide past.

Easily slide past
You can spot a camera by seeing the blue rays. They turn red if you trigger them. The lasers are behind the closed door which stops your slide and you could get stuck in the lasers. Cases like this always shoot the camera so your team can follow easily

Mission end/rewards screen:


The left side shows your equips and how much exp(affinity) they gained. The more mobs you kill the more exp you gain and as you'd guess the more you use a weapon the more exp it gains. Exp is also determined by how much your team used their primary, secondary and melee weapons.
The right half shows the credits and items you obtained.


Wednesday 23 October 2013

Warframe Missions

Warframe Mission types

There are eleven different types of missions as of update 10:
  1. Sabotage
    A mission where you will have to destroy a reactor core if you are abroad a spaceship or some tanks if you are in a mining facility.

  2. Capture
    This mission requires you to find a red crewman and kill them while they try to flee. Once killed capture them by pressing x.

  3. Defense
    The map is usually huge and open, you will have to defend a cyropod or core for at least 5 rounds. Each round will have enemies coming towards the objective and need you to kill them all before they take down the pod's hp. Each wave gets harder as the level of the mobs increases. Keep in mind the cryopod does recover hp and if its hp is low you should keep the last mob alive till the pod recovers fully. At the end of five rounds you will be asked to claim the reward and exit the mission or carry on in the hopes of a better reward. Rewards are usually mods or tower keys and you can only exit every 5 rounds. If this type of mission is on alert then you will have to clear 15 waves to finish.

  4. Exterminate
    Kill all enemies on the map, nice and simple.

  5. Spy
    Involves hacking terminals and picking up the datamass that's dropped. One player can carry all the datamasses. Once a datamass has been picked up by a player, he/she can only use secondary or melee weapon. Switching to primary will drop the datamass.

  6. Rescue
    The hostage will be in a prison area with lots of rooms. Tenno will have to hack the rooms till they find him and then escort him to extraction. The hostage follows behind the person closest to extraction but can sometimes get stuck. Also he doesn't shoot. As long as the hostage is alive when everyone gets to extraction the mission succeeds. The mission fails if the hostage dies so do revive him if he gets downed!

  7. Survival
    Survive for at least 5 minutes and then run to extraction. In this mode oxygen supply is cut off and will slowly go down (you can see it on a bar to the left). As you kill enemies small green containers will be dropped that restore 3% oxygen. Occasionally Lotus will drop a tank of oxygen that restores 30%. Don't waste these as they drop less frequently the longer you survive. I would wait till oxygen drops to 50% before activating one. If oxygen reaches zero your shields will deplete and then your health will drop to 5hp (making you 1hko to all enemies). You now have 5 minutes to get at least one player to extraction before you die and fail the mission. The longer you survive the higher the level of enemies and better the reward. If you want to leave the mission you need half your members to get to extraction for the one minute countdown to appear as opposed to previous versions where only one person going to extraction would start the completion timer.

  8. Mobile Defense
    Players need to take the datamass given at the start and upload it to terminals. Once uploaded players have to defend the terminal from enemies for a set amount of time.

  9. Deception
    Take the datamass and upload it to the computer and then escape.

  10. Conclave
    PvP areas that are 1vs1 or 2vs2 in a best of 3 matches. Some skills are changed from PvE. Each player has conclave points depending on the warframes, weapons and mods equipped. Conclave stages have limits on the points allowed to enter, so you may have to take off some mods if you are too high.

  11. Assassination
    Kill the boss. One of the best way to farm materials and also to get blueprints. Most bosses are going to be reworked apparently to make them harder. The first boss captain Vor has already been remade so he may prove a bit challenging.

  12. Invasion
    This takes place when a faction decides to invade another faction. You can choose between either the corpus or grineer who will give different rewards for helping them (displayed when you click the mission). Rewards are gained regardless of which faction wins as long as you complete the mission on the same faction side 5 times (3 times if against the infested). Infested invasions of assassination missions are the only way to farm nyx parts.

Except defense and conclave all missions will require the player to run to extraction after the objective to finish. Sometimes a secondary mission will start after the primary objective has been completed, extending the mission. Once you finish all the missions on a planet nightmare modes of certain missions will appear on the map as a skull shape. Do not attempt these unless you are well equipped as these can be a real nightmare!


Monday 21 October 2013

First Warframe

Choose your Warframe

After the tutorial ends there's a choice of three warframes. Keep in mind you will be using your starting frame till Europa or Neptune as you will need Control modules to make frames:

Excalibur:

Has a good damage skill in slash dash and is pretty average stats wise. A good starter for beginners as you also get radial blind which causes enemies to run around unable to see you. Excalibur also has the most hp of the starters. This was the frame you used in the tutorial.

Loki:

A good choice that's viable endgame but beware Loki has the lowest health and armor. The reason I recommend Loki is because three of his skills are extremely helpful.

  • First you have a decoy which attracts enemy attention. 
  • Second there's invisiblity allowing you to sneak up on enemies or lose their agro if you cast it midfight. Whilst invisible your melee damage is increased (50% for normal melee and 100% for charged attacks!). 
  • Also there is radial disarm. This skill causes enemies that aren't bosses to lose their ranged weapons, forcing them to come after you and melee.
  • Loki is the fastest frame in the game and good for those who want to play a rogue style (very good with melee) and can put up with the steep learning curve. 
I recommend Loki even though you will be dying a lot initially :p and you will have to cope without any attack skills(radial disarm does 500 damage when maxed... minimal).

Mag:

Her skills can be used to attract bullets to a target, replenish shields and a nice aoe move. However she has very low hp and is more of a support. For a new player I would avoid choosing her for now since some missions you will have to solo because there's no one else playing them and you will need the survivability.


Main Map screen

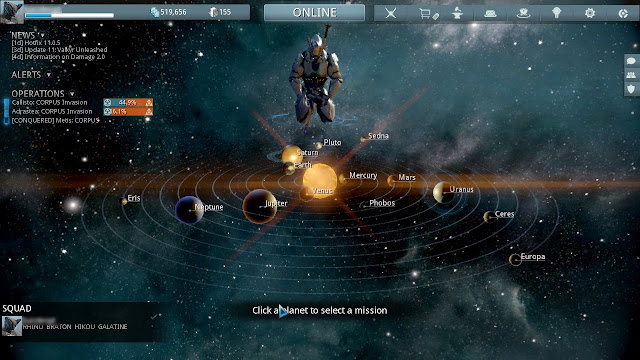
Once you have chosen your warframe you will be at the main map screen.
Warframe Map


As you can see its a solar system and in general the further outwards from the sun you go the more difficult enemies become. Missions are split between the planets and each planet has a boss.

On the top left of the screen is a bar showing your name and mastery rank for your character. You can click it to see additional stats. Just before each rank up the bar will flash and you will have to do a test in order to level up. Bare in mind that you can only take the test once a day if you fail but they shouldn't be too difficult. This mastery rank gains exp for every equip that you level up. Levelling up mastery unlocks more weapons that you can use.

Alerts on the top left below the bar will appear randomly giving a chance to obtain credit, materials or blueprints if you have the mission unlocked on your map. Usually alert missions have harder enemies.
Operations just below will show any invasions that are taking place. You cannot take part in invasion missions if it has already reached 100%.

Clicking the Online button will allow you to choose who can join your missions. Keep it online for now so that other people can join you. Moving to the right:

Arsenal is where you change and upgrade warframes and weapons.
Market is where you can purchase new blueprints and equipment using in game currency(credits) or cash (platinum).
Foundry is where you build frames and weapons. Any blueprints you get from the market or as a drop will be added to foundry and you may craft them when you have enough materials. Bear in mind that crafting takes a while so start ASAP. Thankfully you do not need to be online for crafting to be completed, just go into foundry and collect your gear once crafted.
Inbox occasionally gives you messages from the system and is also where any rewards you get from events or invasions will be delivered.
Codex gives you information on weapons and warframes as well as enemies you use a codex scanner on. Codex scanners can be purchased from the market and then equipped in arsenal.
Keys will allow you to use any tower or clan keys. You can use your tower keys (found from defense missions and logging in reward) to enter tower levels. These missions can be challenging and are invite only so do not attempt unless you are fully equipped and have a squad ready. However keys are only consumed if you finish the mission successfully so you can explore if you get one :p
Settings for gameplay, display, controls and audio. Under controls and key config you may want to assign a key for Gear hotkey slots. This will make it easier to use codex scanners and other consumables.

Along the right click for the chat box, friend list and clan list.


Sunday 20 October 2013

Important moves

The essentials

The tutorial mission will you give you a quick feel of the game but it misses out on some essential moves:
  1. Holding shift to run and pressing ctrl while running will allow you to slide. Sliding stops the loss of stamina whilst running. Whilst sliding you can shoot enemies and pressing melee will do a spinning attack. Sliding can also let you bypass laser doors.

  2. You can also air slide by running, jumping and then pushing ctrl. After pressing ctrl you can also press melee to do a spinning attack and cover more distance. You should master this move because later on when you will be with experienced players you will have to run fast if the team decides to skip enemies and go for objectives only. Currently I believe using this jumping spinning move with dual zorens (maxed fury) is the fastest way to travel.

  3. Wall running(VERY important!) Run towards a wall and jump keeping shift and space pressed. If you run straight on you will climb upwards and releasing space will do a backflip. If there's a wall behind you can wall run again by releasing and repeating the combo. 
    If you run at an angle you will run across horizontally. Releasing the jump button will fling you forwards and it can be hard to control where you land. Once you get the hang of it try it out on smaller surfaces like crates and stuff. Run off any surface! You can find many shortcuts while wall running and if you ever want to stop without flipping off the wall just press ctrl to stop.

  4. Slide and then jump to do a forward flip

  5. Jump and press melee to do a small aoe attack upon landing. Different weapons have different effects, like knocking down the enemy or causing surrounding enemies to burn with the dual heat daggers.

  6. Something else not covered is reviving! If you are in a team and one of you dies you can still shoot with your secondary while downed on the floor. There is a limited time before you die and teammates can revive by coming to you and pressing x. If you are downed you can still crawl about so if your stuck in the middle of green poison, move out of it or else the person trying to revive you will die. Generally whilst downed, enemies ignore you unless you shoot at them. You will die faster if they attack you though.

  7. Press g to lay a waypoint (orange marker) on the minimap for your team to see. This is done usually to highlight resources or mods that have dropped. Mods are used to upgrade your warframe and weapons hence being very important to pickup.

  8. To use any Gear you have equipped press q and on the bottom left of the screen click on the gear you want to use. This menu does not appear if you have the team health menu (press z to toggle) open. However this method of using gear is annoying so I recommend changing the key bindings so that you may use hotkeys for your gear slots. On a sidenote whilst using the codex scanner(hold the left button to scan or right to zoom first) you can still melee but need to press f to go back to primary weapon.

Introduction

Warframe guide

Warframe: Beginner's guide

Introduction

Welcome to my Warframe guide. Warframe is a fast paced co-op shooter by Digital Extremes. As an ancient Tenno warrior it is your role to complete missions destroying the three factions in the game. The Grineer, Corpus and Infested.

Warframe can look pretty confusing when starting out with all the different options available. This guide will cover what beginner's will need to know and what's important such as mods and stuff.

The wiki at http://warframe.wikia.com/wiki/WARFRAME_Wiki covers everything in detail but I feel its a bit all over the place. Hopefully this guide will make it easier for beginners with my attempt at putting things in order.

As this game is still in beta things are continually being changed and added and I will do my best to keep this updated. This game is also being launched on PS4 so I have high hopes for it.

I will be mentioning something called alerts in the guide which will be important in order to get materials and alternative helmets. Although you can see them if you login, I believe its best to follow @WarframeAlerts (https://twitter.com/WarframeAlerts)on twitter incase you don't feel like logging on.

Contents

  1. Important moves
  2. Starting out
  3. The missions
  4. HUD and things to look out for
  5. Upgrading weapons
  6. Recommended Mods - including damage system and enemy weakness list
  7. Recommended path
  8. Recommended weapons
  9. Warframe Boss Droplist
  10. Nightmare mode
  11. End