Saturday 1 March 2014

Warframe Update 12:

This update brings along a new HUD as well as new weapons and warframe Zephyr. These new weapons and Zephyr can be found in the new Tenno research lab at your clan dojo. Also Frost's snowglobe has been nerfed, now lasting 30 seconds and having 3500hp maxed. This makes his globe pretty useless for high level defense missions :(

I am not really a fan of the new HUD. For starters the mini map is more confusing especially in survival mode. Both the oxygen tanks from enemies and the life support from the lotus are labelled with the same yellow marks. Extraction has been replaced with a green marker and blue for teammates. Red now being objectives. In short the new mini map will take getting used to. Here is what the new UI looks like with the old one below it:

The New Warframe UI seems less structured imo
New Warframe UI

Old Warframe UI

Notice how the new HUD removes the background for mission text and changed the colour to white making it harder to read oxygen levels or cyropod health. The old HUD would have this information surrounded in a box and having the important information in red emphasizing it. If they added the background box back it would be better.

Thankfully you can increase the size of the HUD (I recommend it). On the main screen click settings near the top right then HUD and change the HUD scale. You can also switch off HUD motion if you don't like your screen moving around while running.

Another issue I have is that the energy and warframe powers are on the bottom right whilst keeping hp and shields on top right. I prefer having them together on the top right as its much easier to get the info I want at a glance. Also the energy bar is a bit too low down the screen where for some reason it bends.
My next gripe is the party members status showing up on the top right below yours. This again is going to be hard to get used to since most mmorpg games have the party status on the left like before.

On the plus side I love what they've done to the gear selection! Coming up as a circle is so much better than on the bottom left behind where the party info used to be. Its much easier to select gear now. Also we can finally see how much hp our sentinel has! I would still prefer the old UI though.

Saturday 4 January 2014

Nightmare Mode

Nightmare mode:

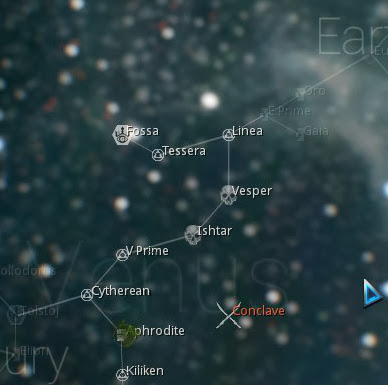
Earlier you probably noticed me mentioning nightmare mods and telling you not to do them untill you are ready. Nightmare missions will appear once you complete all the missions on a planet. The nodes that have nightmare mode will be marked as a skull.

nightmare missions will be shown as a skull
As you can see Vesper and Ishtar have nightmare modes at the moment.

First thing to bare in mind is that the rewards for doing nightmare mode are random so you may not get the mod you want. Secondly each time you enter a nightmare mode there will be up to three different conditions imposed on you. Here's a list of them:
  1. All enemies will do around triple their normal damage on you
  2. Reloading time is increased
  3. Storage lockers no longer drop ammo
  4. Low gravity so that its harder to jump and loots fly about
  5. Enemies are at a higher level than normal
  6. Those explosive barrels now cause 1000 damage.
  7. Mission might have a timer. Every kill will add 5 seconds
  8. Energy drained constantly. It drains pretty fast so don't wait too long to use your skills.
  9. Hp might drain constantly. Killing enemies will recover hp though.
  10. Saving the best till last.... NO SHIELDS!
Also lets not forget that all enemies in nightmare mode will be the upgraded versions of the normal ones hence being harder to kill.
If you get the last condition I would recommend leaving and restarting the mission. Unless you're rhino with ironskin it really is too difficult and would take forever as people would have to take cover. However if you are looking for a challenge then by all means go ahead but it will be difficult to find people who will not quit this mode. Without shields and enemies having damage buffs you would probably die in three four shots. Actually even Rhino can't save you for long if there's no energy :p. Before doing a nightmare mode have at least one good weapon fully modded up and make sure your frame is also fully modded. Consider adding vitality and shield mods.


Saturday 23 November 2013

Warframe Update 11

Notice: Warframe Update 11

Update: Recommended mods section is up to date including new element system.

This update brings a lot of changes and most importantly a new damage system, user interface, enemies and more. Therefore some of the guide will be outdated for now but I will do my best to update :)

For a quick view of changes to the damage system click below to go the official forum post:
https://forums.warframe.com/index.php?/topic/132366-information-on-damage-20/

Monday 11 November 2013

Warframe Boss Droplist

Warframe Boss Drops:

For convenience here are the bosses and their drops, rare mats in bold. As all the bosses are getting revamped I won't be doing a boss guide right now. All blueprints picked up can be seen at the mission end screen.

Mercury:

Resources: Ferrite, Polymer Bundle, Detonite Ampute, Morphics
Blueprints: Cronus, Seer pistol components
Enemy: Grineer

Venus:

Resources: Alloy Plates, Polymer Bundle, Circuits, Fieldron Sample
Blueprints: Rhino parts
Enemy: Corpus

Earth:

Resources: Ferrite, Rubredo, Detonite Ampute, Neurodes
Blueprints: Oberon parts
Enemy: Grineer

Mars:

Resources: Salvage, GalliumFieldron Sample, Morphics
Blueprints: Mag parts
Enemy: Corpus

Jupiter:

Resources: Alloy Plates, Salvage, Neural Sensors, Fieldron Sample
Blueprints: Valkyr parts
Enemy: Infested

Saturn:

Resources: Nano Spores, Plastids, Orokin CellDetonite Ampute
Blueprints: Ember parts
Enemy: Grineer

Sedna:

Resources: Alloy Plates, Salvage, Rubredo, Detonite Ampute
Blueprints: Saryn parts
Enemy: Grineer

Uranus:

Resources: Plastids, Polymer Bundle, GaliumDetonite Ampute
Blueprints: Ash parts
Enemy: Grineer

Phobos:

Resources: Alloy Plates, Plastids, RubredoMorphics
Blueprints: Gremlin, Miter (weapon blueprints), Trinity parts
Enemy: Grineer

Europa:

Resources: Rubredo, Fieldron Sample, Morphics, Control Module
Blueprints: Nova parts
Enemy: Corpus

Neptune:

Resources: Nano Spores, Ferrite, Fieldron Sample, Control Module
Blueprints: Loki parts
Enemy: Corpus

Eris:

Resources: Nano Spores, Plastids, Fieldron Sample, Neurodes
Blueprints: Nyx parts (no longer any boss on this planet after update 11)
Enemy: Infested

Ceres:

Resources: Alloy Plates, Circuits, Orokin Cell, Detonite Ampute
Blueprints: Frost parts
Enemy: Grineer

Pluto:

Resources: Alloy Plates, Plastids, Rubredo, Morphics
Blueprints: Excalibur parts
Enemy: Corpus

Banshee blueprints can be found randomly after spy, capture and endless defense missions.
Volt blueprints can be found in survival missions after 20 minutes.
Vauban can be found in alerts
Nyx can be found when the infested invade a boss node. Defeat that boss during the invasion to get the parts.
Nekros can be found in orokin derelict assassination missions


Recommended Weapons

Which Warframe and weapons to use?

In order to use the better weapons from the market and dojo you will need to level up your mastery rank. This is done by levelling up your equips. Since every equip has its own strengths and weaknesses its best to try as many as you can till you find the best one for you. 

The current starting weapons you have equipped are pretty weak. In fact I suggest getting the Braton as soon as you can buy it from the market (25k credits) and ditch leveling the mk1 till later (I hate that gun!) 

The lato is okay and when maxed you could get the aklato and then start to build either a hikou or kunai

After defeating the first boss on Mercury you will receive a blueprint for a Cronus. You should have the resources to build it straight away and it is a straight upgrade from the Skana with more damage and attack speed.

However in order to level your mastery rank it is best to max out your weapons, so I would keep using the lato and skana till they are maxed since they were okay.

For a full list of weapons please refer to the wiki or alternatively look at the codex ingame:

Recommended Warframe:

At the moment there are 15 different warframes. Each warframe has its own unique skills and playstyles.. Please go to the wiki to research more on their stats and abilities as well as where their blueprints drop. Banshee blueprints will drop randomly as you play the game so keep your eye out. The rest are mainly boss drops.


In general:
Tanks: Rhino, Frost
Stealth: Ash, Banshee, Loki
Glass cannon Dps: Ember, Mag, Nova
Crowd control: Nekros, Nyx, Vauban
Support: Trinity, Volt
Saryn being a poison type with good armour (Tanky dps?)
Excalibur being all rounder (Couldn't decide).

Of course the above is just a generalisation of their roles and all have damage skills and utility to some extent. Since you have to level up your mastery try as many as you can!
You may have noticed prime warframes and weapons. To get these you will need to enter the void with the tower keys and farm those missions (wait till you get your gear ready).

Recommended weapons to build:

Primary:

Boltor - since it ignores armor. Make sure to put in a speed trigger as the bolts fly slowly and you need to get used to the projectiles. Also the accuracy is poor at long range.

Latron - has good damage but a slow fire rate so make sure to have an aoe melee weapon or fast secondary if you get crowded. Its pretty good at any range but it is semi automatic. (I redefined my keys so that scrolling the mouse wheel fires instead of clicking... much easier firing pistols and semi automatics now)

Flux and Synapse are considered the best primaries at the moment but you will need to level your mastery quite a bit to get them.

Secondary:

Hikou or Kunai are great secondaries but are projectile type. Afuris is good due to its high firerate but is inaccurate at long range.

Melee:

Although the Cronus is very good, like all longswords it only hits one enemy at a time.
Dual blades and heavy weapons can hit more than one enemy so I would recommend these.

Dual ethers for normal attacks as they have good attack speed and stagger enemies. As of update 11 these no longer stagger on every hit hence they are no longer recommended.

Dual heat swords are good for charged attacks but they don't stagger with a jump attack. Instead a jump attack will cause a small aoe attack burning nearby enemies.

Galatine(mastery  level 3) and Orthos(mastery level 2) are the best for Charged attacks.

Keep in mind that all weapons have their strengths and weaknesses and it really is down to you. Once fully modded most weapons will perform well.


Saturday 9 November 2013

Recommended path

Recommended path:

Update11: The new update adjusted all enemy levels so that level 100 enemies are now level 40. However the exp gain has also been reduced meaning you will have to grind longer :( 
Kappa is still a really place to grind but you may also want to grind on apollodorus on Mercury (or any other survival or defense mission). 
It's a survival mission where enemies get progressively harder and you can access it early. However to get the most exp you need to stay as long as possible on one level and the problem with that is the longer you stay, the higher the chance you might disconnect meaning no exp. 

First I would focus on getting to Sedna and unlocking the mission on Kappa.

The reason I want you to unlock this mission is because it is a great place to level up your frames and weapons. 
  • Kappa is a mobile defense mission and needs you to defend at three different locations. Stay near the object you are defending! I've seen quite a few missions fail because no one was paying attention to the objective.
  • It has a lot of enemies who are around level 21, which is hopefully what you should be by the time you get there.
  • Even if your gear is not near 20, higher levels also play this map in order to level up their weapons so you should have plenty of help.
  • Also you can get a lot of mods here in order to upgrade. If you still have not got your serration or streamline mod then farming here will probably get you one.
  • You could also level up a bit at Lith on Earth but those enemies are only near level 13 so it would take longer to max your weapons and frame.
  • Just as a precaution when levelling. If you are going to level up new weapons or frames, keep at least one weapon at a high enough level to do damage or a frame that has its skills levelled up so that if your team is not doing well, you can switch weapons and take care of things. Note you still get exp if you fail the mission but you lose any mods and items you found.

The path:

Mercury – Venus – Earth – Saturn (top left from Earth after Everest) – Sedna (Do the missions leading to the top right from the start of Saturn map where Tethys is the last mission).

The Earth map. Go left after Everest.

Follow this path to Sedna.

Our goal.

Note that the boss of Venus drops Rhino blueprints.
You should farm him till you get the helm, systems and chassis.

Reasons for building Rhino first:

  • Ability called Ironskin which when maxed can absorb 1200 damage! Also prevents you getting knocked down while active, making you a good tank.
  • Rhino stomp does aoe damage and it causes surrounding enemies to be lifted in the air for a good amount of seconds when upgraded. If playing with a rhino and they use rhino stomp, lifting enemies, carry on shooting till their dead... I keep seeing people stop shooting for some reason.
  • At the beginning your running speed will be the slowest of all the warframes, however once you get the alternate helmet(25% speed) from an alert and a nicely upgraded rush card you will be able to keep up easily with the rest. Alternatively build and equip dual zorens and do the jump slide spin move  mentioned earlier to travel.
  • You will need a control module in order to build his and every other warframe's system. In order to get rhino early you should try asking for help in chat. Many higher levels won't mind inviting you to their squad and helping you get it.
  • Whilst playing with higher levels be warned that some will just rush past enemies to kill the boss (due to boredom from repeating the same tileset over and over). Do your best to keep up and run past enemies without attacking, Loki's invisibility will help immensely. Not everyone likes rushing though (I don't) and will kill most things on the map. 
  • If you cannot find a team then the best way to get control modules is by going to Europa or Neptune, preferably Europa because of the lower level monsters (30-42 as opposed to Neptune's 42-60). Hunting the boss is the best way to farm although you can get these in other missions but at a lower rate. You could also get them from alerts but they are pretty rare.
After you are done leveling up you may continue with the rest of the maps however after finishing mars do not go Phobos! I found those enemies too high for the weapons available if you went Venus – Earth – Mars – Phobos. Using my modded boltor at rank 30 it took a full clip for me to kill each enemy on that map and I have no idea why it's after mars :p, just ignore it for now.


Sunday 3 November 2013

Recommended Mods

Recommended Mods

Since there are many mods here's some of my recommendations for best mods, but change them around depending on your playstyle and weapon. For a full list of mods available please refer to the wiki at http://warframe.wikia.com/wiki/Mods

Try to level important mods together instead of trying to max only one. For instance if you have a slow firing weapon don't level up serration so much that you can't put speed trigger in. You'll be happier with some attack speed and good damage.
As this post is quite long I have split it into sections:

Rifle mods
Pistol mods
Shotgun mods
Melee mods
Elemental damage system
Enemy weakness table
Warframe mods
Aura mods
Sentinels

Update 11: A new damage system was introduced along with new mods. Each weapon now also gives three different types of damage: impact, puncture and slash. Each can be increased by use of their respective mod cards.

Damage = impact + puncture + slash + elemental

After spending time testing the new system it appears that the best general damage is still from cards that increase all damage such as serration (others that are listed below in their respective categories) and an elemental mod.

However if a weapon has a lot more of one type of damage than the others such as a flux rifle, which has 120 slash and 15 for impact and puncture, then using the new mod card that increases slash damage (Sawtooth clip in this case) will be effective. The new cards are best for melee since you can level them up to give 90% extra. Each type is good against different enemies.

Corpus humans – Impact, slash
Corpus robots – Impact
Grineer – Puncture, slash
Infested – Slash

The new damage mods can be upgraded to give a maximum of 30% for rifles and shotguns, 60% for pistols and 90% for melee weapons.
A new element system was also introduced but more on that below.

Weapon Mods

Rifle mods:

Serration – Gives more damage. Very difficult to max but try at least 75% (takes up capacity of 8). Once your weapon has an orokin try to make this at least 150%.

Sawtooth clip – Increases the slash damage of rifles

Rupture – Increases the impact damage of rifles

Piercing hitIncreases armor piercing damage. Good for all enemies and should be at least 40% (takes up capacity of 7). For enemies that don't have armor its still useful as it counts as elemental damage. As of Update 11 this mod is useless!! As it now only increases puncture damage by maximum of 30%. So it's good for guns with high puncture like the boltor. Before update 11 you could upgrade this to give 90% armour piercing :-(

Split chamber – Each bullet has a chance of shooting one more without costing ammo (multishot). Although a very good mod and important for dps this mod is VERY hard to find. It also costs a minimum of 10 to equip, so not recommended till you potato your weapon.

Speed Trigger – Increases fire rate. I find 30% (takes up 6 mod capacity) enough for most guns as any higher would mean too much ammo loss.

Bane of Corpus/Infested/Grineer - Increases base damage and any elemental mod damage. Most missions have one main type so exchange mods as needed.

Infected Clip – Poison damage which is good against grineer but weak against infested and robots. However it bypasses shields.

Cyro rounds – Ice damage. Very good for enemies that have shields and also slows down enemies.

Stormbringer – Electric damage that's effective against corpus as it stuns them if they have no shield

Hellfire – Fire damage which is best against infested

Fast hands – Increases reload speed. Use this if your gun takes ages to reload.

Wildfire – fire damage and magazine capacity. A nightmare mod that you get randomly for finishing a nightmare mission. It can be very hard to get so I wouldn't waste time getting it if you're starting out.

Shred – fire rate and punch through (bullet goes through enemies and objects). Another nightmare mod that I would not waste time getting till later.

Metal Auger – As of update 11 this can be maxed to give 2.1 metres punch through. This can be quite useful when fighting enemies that are bunched together or those grineer who have shields as this mod allows you to shoot through them.

Pistol mods:

Pistol mods get the best stat increases per rank up.

Hornet strike – Increases damage. At least 100% that takes up a capacity of 8

No return/Razor shot/Concussion rounds – Increases puncture/slash/impact damage respectively

Gunslinger – increase firerate

Expel infested/Grineer/Corpus - Increases damage, exchange as needed.

Barrel diffusion – Multishot. Yes its hard to find.

Pathogen Rounds  – Adds poison damage to pistols

Deep freeze – Ice damage

Heated charge – Fire damage

Convulsion – Electric damage

Quickdraw – Faster reload speed

Seeker – Allows your weapon to punch through. Beware this mod will use up 11 slot capacity to equip.

Lethal torrent – a nightmare mod that gives multishot chance and fire rate. It stacks with barrel diffusion so if you max both you get an 180% chance of multishot. That means you're guaranteed 2 shots from 1 bullet and an 80% chance of a 3rd shot! Definitely try and get this when you're ranked up well.

Shotgun mods:

Point Blank – Increases damage

Flechette/Disruptor/Shredder – Increases puncture/impact/slash damage

Tactical pump – faster reload speed

Cleanse infested/Grineer/Corpus – Increases damage, exchange as needed.

Hell's Chamber – Multishot

Contagious Spread   Adds poison damage to shotguns

Chilling Grasp – Ice damage

Incendiary coat – Fire damage

Charged Shell – Electric damage

Blaze – Nightmare mod that gives Damage and Fire damage

Accelerated blast – Nightmare mod that gives armour penetration and firerate.

Seeking force – Allows bullets to punch through

Melee:

As of update 13, melee 2 has arrived removing charge attacks and introducing a new combo system. 
You can either press e to do normal melee whilst holding your primary/secondary weapon or equip melee weapon by holding down the f key. In melee mode holding the right mouse button will block in the direction you are facing (takes up stamina). Holding the left button will add 20% extra damage when you press e but this will take up energy. 
In order to use the combo system you will have to find and equip stance cards. Each type of melee will have their own stance card and you can find out the combos when equipping them. Also equipping a stance card works like an aura card in that it increases the mod capacity for your melee weapon.

There are two ways of playing with a melee weapon and its important mod wise that you find out which style you prefer.
You can either spam the melee button using weapons that have fast attack speed or use charged attacks by holding down the melee button.

For charged attacks:

Killing blow – Increases charged attack damage

Reflex coil – Lets you charge attacks faster

Rending Strike – Nightmare mod that adds puncture damage and increases charged damage

Focus energy – Nightmare mod that increases charge speed and adds electric damage

Fury – Speeds up motion of charged attack and also increases attack speed

For normal attacks:

Pressure point – Increases base damage but does not help charged attacks

Fury – Increases attack speed and speeds up motion of charged attack

For Both styles:

Smite corpus/grineer/infested – Increases damage against respective faction

Sundering Strike/Heavy Trauma/Jagged Edge – Increases puncture/impact/slash damage respectively

Fever Strike  – Poison damage

North wind – Ice damage

Molten impact – Fire damage

Shocking touch – Electric damage

Reach – Increases melee range

So those are the important weapon mods (not including crit builds). Also most enemies take more damage if you aim for the head.

Elemental damage:

I mentioned elemental mods earlier, each element is good for different factions take a look below. Make a habit of switching mods for the enemies you face (it tells you on the map screen which faction you're up against). 

Corpus – Use electric mods for more effective damage against these.
Grineer – Armor penetration mods to deal the most damage since most have armor.
Infested – Fire mods give the best damage

So pair these elements up with mods that increase damage against a faction. 
If you have enough space do put on a secondary elemental mod as that will also increase damage. I would recommend an ice mod as it slows enemies down on hit and is effective against shields. 

As of Update 11: Elemental mods can now be combined to provide better effects:

  • Ice + Electric = Magnetic                      Reduces Max Shields
  • Ice + Fire = Blast                                   Small Aoe Knockdown effect
  • Ice + Poison = Viral                               Reduces Max HP
  • Fire + Poison = Gas                               AOE poison effect
  • Fire + Electric = Radiation                    Causes Confusion
  • Electric + Poison = Corrosive                Reduces Armour
If you have more than two elements or are using a weapon with its own element then the priority for combination starts from left of the first row and then from left of the bottom row on the mod equipping screen for the weapon. Eg.


Since electric and ice mods are first two elemental mods in the order they combine to magnetic leaving fire by itself as heat. If the weapon had an element then the fire will combine with that native element.


This time the fire and electric mods are switched. This leads to Fire and ice combining to form blast and leaving electricity by itself.

Final Enemy weakness list:

So if we add these new element combos to the list of enemy weaknesses (bold being best) we get:

Corpus humans – Magnetic, Fire, Viral, impact, ice, toxin
Corpus robots – Magnetic, Impact, cold, electric, radiation, corrosive
Grineer – Puncture, Corrosive, Fire, Viral, blast, gas, toxin, slash
Infested – Slash, Fire, Blast

For the best dps you will have to potato your weapon but that can wait till you find a nice weapon you like and have more experience.

Warframe Mods

Every warframe has different stats and a different way of playing. They also come with all 4 of their skill mods when you build them. These skill mods can also be upgraded for better damage or duration,

Focus – Increases damage from abilities. Do not get it for warframes that have no damage skills like Loki.

Continuity – Increases duration of skills like decoy.

Streamline – Increases power efficiency so less energy consumption.

Flow – Increases maximum energy.

Constitution – Nightmare mod that Increases skill duration and helps you get up faster if you were knocked down.

Stretch – Increases the range of your skills.

Rush – Increases run speed of your frame.

Marathon – Increases stamina so you can run longer.

Redirection – Increases Shields

Fast deflection – Increases the rate at which shields recharge.

Vitality – Increases hp

Vigor – Nightmare mod that increases hp and shields

Thief's wit – The minimap will show nearby containers and resources as a yellow mark. Hopefully you won't need this once your used to what everything looks like.

Aura mods:

These mods can be obtained from alerts and give your warframe an effect as well as increasing the total mod capacity. Its best to get a matching polarity as it doubles the extra slots given. Level them up for increased effects and increased mod capacity.
Their effects also apply to the whole team and can stack, so make sure you get one ASAP.

Energy siphon – Restores energy to the team. Maxed it gives 6 energy every ten seconds. If your whole team has one that's 24 every ten seconds. Probably one of the best.

Physique – Increases max hp

Rifle amp – Increases rifle damage. 27% more when maxed.

Steel charge – Increases melee damage. 18% more when maxed.

Rifle/shotgun/sniper/pistol scavenger – Increases ammo gain from pickups

Rejuvenation – Restores team hp.

Shield disruption – Reduces enemy shields

Corrosive projection – Reduces enemy armor

Enemy radar – Shows enemies on minimap as red dots.

Speed holster – increases speed you can switch weapons.

Infested impedance – Reduces speed of infested.

Try and get any aura mod at first as something is better than nothing especially when you don't have much mod capacity in the beginning.

Sentinel:

These are floating companions that have their own hp and skill. Different Sentinels come with their own special skill mods and guns. At the moment there are 5 sentinels. The first four can be bought from the market place for platinum or built from blueprints that cost 100k credits:

Shade – Makes you invisible when enemies are near till you attack them
Wyrm – Can stun nearby enemies
Dethcube – Highest dps of the sentinels
Carrier – It picks up drops.
Djinn – You will need a clan in order to craft this from clan research. Its a fighting type that attracts enemies and stuns them for a short period.

You can also equip their guns the same way as you would a rifle with some exceptions. Sentinels do not run out of ammo so you can ignore adding any ammo mods. Also they have 0% crit so no need for crit mods either. 
Best to add serration, speed trigger and other damage mods of your choice.

Mods for sentinels:

Coolant leak – Slows nearby enemies down

Guardian – Sentinel charges your shields up

Regen – Sentinel revives when it dies. It recovers more hp the more you level this up.

Sanctuary – Puts a shield up when you try to revive an ally

Spare parts – Has a chance to drop rare materials when sentinel dies and cant revive. 45% chance when maxed

Vitality – Increases sentinel hp

Steel fiber – Increases sentinel armour

You may have noticed that I left out the corrupted mods. That's because those mods can only be obtained from the orokin derelict and need a well equipped team. You can purchase the blueprint key to enter in the market, it uses nav coordinates which are those black orbs you may find in containers. Also every corrupted mod gives a negative effect as well as positive.

As for crit builds it's best to wait till later in the game till you have access to better weapons. Generally sniper rifles and bows have a good crit rate making them viable for crit builds. However they have a slow fire rate so make sure you have an aoe melee or fast secondary in the event you get swarmed.

Friday 1 November 2013

Upgrading weapons with mods

Warframe Arsenal

Hopefully after finishing the first two missions your warframe and weapons will have leveled up and you would have found a few mods. Back at the map screen choose Arsenal and lets equip some mods.

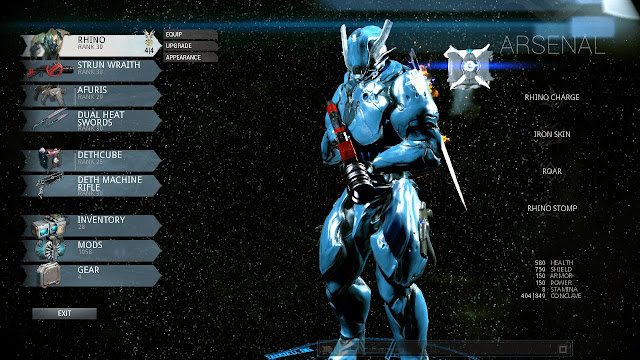
Warframe Arsenal

On the right are your stats and skills (changes depending on what you mouse over). 
On the left are your current equips. Mouse over them to either change them by clicking equip, upgrade to equip mods and appearance to change colors and equip alternate helmets (they give stat boosts as well as a new look).

Gear lets you use codex scanners, hp restores and ammo boxes. You can get these from the market and then equip them here by clicking on an empty panel and choosing your item. You must EQUIP gear before you can use them. This is where binding a key to gear slots helps or you will have to keep choosing which gear to use during the level.

For now go to your warframe and select upgrade, which brings us to:

Warframe upgrade screen where you can equip mod cards
Upgrade screen for Warframes. Note the extra aura slot on the left does not appear for weapons
The mods which you collect that can be equipped will be on the left side. Next to the name of each mod is a number and symbol (polarity). The number shows how much mod capacity it will take up when equipped. 
Notice that the total mod capacity you can equip is on the blue bar above the slots. The total mod capacity goes up by one for every level you gain on that equip, to a maximum of 30 (without orokin/potato).
Simply drag and drop the mod you want to a slot on the right to equip it. You cannot equip two of the same mod on an equip.

The slots with a pattern on the top right are polarity slots and are different for each warframe and weapon. 
If you match the polarity on the top right of the mods with a polarity slot then the mod consumes half of what it states rounded up. However if you try to equip a different polarity then the mod consumption is increased by a third.

A difference between warframe and weapon slots are that warframes have an extra slot on the left. These are aura slots and if you get an aura card from an alert, you can equip it to increase mod capacity (match the polarity to double the increase!).

As your warframe is where you equip your skills (their mods are given automatically when you build your frame) and skills take up mod capacity, try and get any aura card in the beginning so that you will not run out of space just equipping skills.

Also notice on top you can install an orokin reactor/catalyst(aka potato because of the shape) or polarize(with forma) your gear. These are obtained by crafting from blueprints which are found in alerts or can be bought from the market with platinum (real money).

Installing an orokin (aka potato) will double mod capacity (can only be done once per equip). 
Polarizing with forma will let you change one of the slots into a polarity slot. This can be done multiple times but the level for the equip will drop back to zero. Leveling up these weapons again will not count towards your main mastery rank.
Once you are done equipping mods click apply and we'll now upgrade those mods.

Enhancing mods:

Every level gained on your equip gives you one more mod capacity. Click on mods on the bottom left

Warframe mods can also be enhanced
.
Click on a mod and you will be given the 4 choices shown.

Transmute lets you combine 4 mods in order to get another random mod, I wouldn't recommend using this method though.

Fusion is how we level up mods. Choose a mod and click fusion. Now click any mods you don't need and it will level up the mod you first chose every time the bar on the left goes full. Each level up gives a good increase but also increases mod consumption by one.
The best way to upgrade is to combine mods with duplicates and fusion cores (not used for anything else). Using different mods with different polarities to the one you want to upgrade will require four times more mods! However if you do not have any need for those mods then by all means go ahead.

If you can no longer see the fusion button that means the mod is maxed.
Finally exit the mod screen and apply any changes you make. 


Sunday 27 October 2013

HUD, drops and hacking

HUD

Start your missions in Mercury and get used to aiming and moving. Kill anything in the way.
The mission map changes every time but there are a fixed amount of tilesets so eventually you will learn the patterns and know where the shortcuts are. As you are low leveled and will not have access to all abilities till you can equip their mods, do make use of cover!


  • On the top left is a mini map. The yellow exclamation (!) mark is where the objective is. Once the objective is completed extraction will have a big red mark on the minimap.
  • If playing a defense mission or exterminate mission, then just below the minimap you will see how many enemies are left or how much hp the objective you're defending has.
  • The top right is your status showing your warframe and it's level. 
  • The four boxes show the skills equipped and left to right are assigned 1-4 on the keyboard.
  • Blue number is your shield and red is HP.
  • The blue bar is the energy you have for using skills and the green bar shows your stamina. Stamina is consumed by running and wallrunning. If it depletes to zero it will take some time to recover and you will fall off if wallrunning.
  • The bottom right shows what weapon your using and how much ammo you have left.
  • Just above the ammo box at the beginning of the mission you will see a challenge. If you manage to complete it then you get 500 affinity/exp.
  • The bottom left is where chat is. Press t to open the chat box. Pressing z will allow you to see your team's hp on the bottom left.
  • When you aim at an enemy or object its name will appear on the top middle with level and hp. If the bar is blue then the enemy has shields like your warframe.
  • Any drops you pickup will be displayed on the bottom of the screen.

Mini-Map


  • The objective of the mission will have a yellow exclamation mark. 
  • The arrowhead shape at the centre of the minimap is your position. 
  • Green circles are allies.
  • That orange mark near the exclamation mark usually appears on extermination missions, showing where the enemies roughly are.
  • If someone has an aura mod called enemy radar or if you equip enemy sense the enemy will appear as red circles.
  • When someone is downed a red mark will also appear. 
  • Once the objective is complete, extraction will be shown with a red mark:


Drops

Containers you can destroy for drops:


Green Lockers you can open by standing in front of them and pressing x.

Only the green ones can be opened unless you find a rare mod that unlocks red lockers. (I haven't found that mod yet...)

If you have the mod “thief's wit” equipped, nearby containers will have a yellow marker on the minimap:


Mods only drop from enemies:
Resources can come from lockers, containers and enemies

The Mod is the one on the left with blue around it. The one on the right with yellow markings are resources. There are also resources which are marked blue and these are generally the rarer resources.

Once you pickup a mod if there is a strange blue spinning thing leftover, it means not everyone in your team has it picked up and you should lay a waypoint by pressing g on it. This way your team can see it on their minimap:

Someone missed their mod :(

Ammo comes in four different colours:
  • Blue is for rifles and refills 20 rounds. 
  • Orange is for secondary weapons also refilling 20 rounds.
  • Green refills shotguns by 10.
  • Purple(not shown) refills sniper weapons or bows by 10.

Ammo

Credits are also dropped:

Credits are the small blue rectangular objects.


Energy(blue orb), health (red orb that recovers 25hp) and affinity (white orb that gives exp+100 for the warframe) orbs.

Blue orbs give 25 energy


Blueprints are purple and you can check in your foundry to see what you got. Blueprints used to drop as a purple orb from bosses but that has now been stopped. Instead you will get a blueprint after you finish the mission in your rewards screen. Right now I can only see the stalker dropping blueprints for his unique weapons:

Blueprints

Hacking terminals and other obstacles

Sometimes an enemy will lock you out of rooms and you will have to hack a terminal to open the doors. Once this happens the minimap will show a green marker where a terminal is.

Note how its darker and bigger than your teammates' green

Go to the terminal and press x to start a minigame. In this minigame you have a time limit to click on each piece (they rotate clockwise) until they all join up.


Its not difficult just remember to kill nearby enemies first

If playing as a team most levels will have a door, that needs two people to stand on the orange panels on the side of the door and press x at the same time.


Some missions, corpus levels in particular will have laser doors that you can either slide past or deactivate by shooting a camera. Shooting the camera allows you and your team to pass easily as some doors make it hard to slide past.

Easily slide past
You can spot a camera by seeing the blue rays. They turn red if you trigger them. The lasers are behind the closed door which stops your slide and you could get stuck in the lasers. Cases like this always shoot the camera so your team can follow easily

Mission end/rewards screen:


The left side shows your equips and how much exp(affinity) they gained. The more mobs you kill the more exp you gain and as you'd guess the more you use a weapon the more exp it gains. Exp is also determined by how much your team used their primary, secondary and melee weapons.
The right half shows the credits and items you obtained.


Wednesday 23 October 2013

Warframe Missions

Warframe Mission types

There are eleven different types of missions as of update 10:
  1. Sabotage
    A mission where you will have to destroy a reactor core if you are abroad a spaceship or some tanks if you are in a mining facility.

  2. Capture
    This mission requires you to find a red crewman and kill them while they try to flee. Once killed capture them by pressing x.

  3. Defense
    The map is usually huge and open, you will have to defend a cyropod or core for at least 5 rounds. Each round will have enemies coming towards the objective and need you to kill them all before they take down the pod's hp. Each wave gets harder as the level of the mobs increases. Keep in mind the cryopod does recover hp and if its hp is low you should keep the last mob alive till the pod recovers fully. At the end of five rounds you will be asked to claim the reward and exit the mission or carry on in the hopes of a better reward. Rewards are usually mods or tower keys and you can only exit every 5 rounds. If this type of mission is on alert then you will have to clear 15 waves to finish.

  4. Exterminate
    Kill all enemies on the map, nice and simple.

  5. Spy
    Involves hacking terminals and picking up the datamass that's dropped. One player can carry all the datamasses. Once a datamass has been picked up by a player, he/she can only use secondary or melee weapon. Switching to primary will drop the datamass.

  6. Rescue
    The hostage will be in a prison area with lots of rooms. Tenno will have to hack the rooms till they find him and then escort him to extraction. The hostage follows behind the person closest to extraction but can sometimes get stuck. Also he doesn't shoot. As long as the hostage is alive when everyone gets to extraction the mission succeeds. The mission fails if the hostage dies so do revive him if he gets downed!

  7. Survival
    Survive for at least 5 minutes and then run to extraction. In this mode oxygen supply is cut off and will slowly go down (you can see it on a bar to the left). As you kill enemies small green containers will be dropped that restore 3% oxygen. Occasionally Lotus will drop a tank of oxygen that restores 30%. Don't waste these as they drop less frequently the longer you survive. I would wait till oxygen drops to 50% before activating one. If oxygen reaches zero your shields will deplete and then your health will drop to 5hp (making you 1hko to all enemies). You now have 5 minutes to get at least one player to extraction before you die and fail the mission. The longer you survive the higher the level of enemies and better the reward. If you want to leave the mission you need half your members to get to extraction for the one minute countdown to appear as opposed to previous versions where only one person going to extraction would start the completion timer.

  8. Mobile Defense
    Players need to take the datamass given at the start and upload it to terminals. Once uploaded players have to defend the terminal from enemies for a set amount of time.

  9. Deception
    Take the datamass and upload it to the computer and then escape.

  10. Conclave
    PvP areas that are 1vs1 or 2vs2 in a best of 3 matches. Some skills are changed from PvE. Each player has conclave points depending on the warframes, weapons and mods equipped. Conclave stages have limits on the points allowed to enter, so you may have to take off some mods if you are too high.

  11. Assassination
    Kill the boss. One of the best way to farm materials and also to get blueprints. Most bosses are going to be reworked apparently to make them harder. The first boss captain Vor has already been remade so he may prove a bit challenging.

  12. Invasion
    This takes place when a faction decides to invade another faction. You can choose between either the corpus or grineer who will give different rewards for helping them (displayed when you click the mission). Rewards are gained regardless of which faction wins as long as you complete the mission on the same faction side 5 times (3 times if against the infested). Infested invasions of assassination missions are the only way to farm nyx parts.

Except defense and conclave all missions will require the player to run to extraction after the objective to finish. Sometimes a secondary mission will start after the primary objective has been completed, extending the mission. Once you finish all the missions on a planet nightmare modes of certain missions will appear on the map as a skull shape. Do not attempt these unless you are well equipped as these can be a real nightmare!